အားလုံးပဲ မင်္ဂလာပါ။
ညီမကတော့ Spiceworks Myanmar မှာ Web Designer အဖြစ် တာဝန်ယူလုပ်ကိုင်နေတဲ့ နီလာဌေး ဖြစ်ပါတယ်။ ဒီနေ့မှာတော့ pre-processor scripting languages တွေထဲမှာ popular ဖြစ်တဲ့ Sass အကြောင်းကို လေ့လာထားသလောက် ပြန်လည်ဝေမျှပေးချင်ပါတယ်။
Sass Introduction
Sass က CSS pre-processor တစ်ခုဖြစ်ပါတယ်။ နောက်ပြီး CSS ကို ထပ်ခါထပ်ခါရေးခြင်းမှ လျှော့ချပေးနိုင်လို့ အချိန်ကုန်လည်း သက်သာစေပါတယ်။ Sass မလေ့လာခင် အခြေခံအားဖြင့် HTML, CSS တို့ကိုတော့ သိထားဖို့ လိုအပ်ပါတယ်။
What is Sass?
Sass stands for Syntactically Awesome Stylesheet and is an extension to CSS.
Sass ကို 2006 ခုနှစ်မှာ Hampton Catlin က design လုပ်ခဲ့ပြီး Natalie Weizenbaum က develop လုပ်ခဲ့တာပဲ ဖြစ်ပါတယ်။
Why Use Sass?
Stylesheets တွေက ကြီးလာပြီး ရှုပ်ထွေးလာတယ်။ နောက်ပြီး maintain လုပ်ဖို့ ခက်ခဲလာတယ်။ အဲ့ဒီပြဿနာတွေအတွက် CSS pre-processor (Sass) က ကူညီပေးနိုင်တယ်။ CSS မှာမပါတဲ့ nesting, mixins, inheritance, maintainable CSS စတဲ့ features တွေကိုလည်း သုံးလို့ရတယ်။
How Does Sass Work?
Sass က browsers အားလုံးမှာတော့ တိုက်ရိုက် support မပေးပေမယ့် browser နားလည်အောင် လုပ်ပေးလို့ ရပါတယ်။ အဲ့ဒီအတွက် Sass code ကို CSS code ပြောင်းပေးဖို့ Sass pre-processor ကို လိုအပ်ပါတယ်။
Sass File Type
၁။ SCSS syntax (.scss)
၂။ Indented syntax (.sass)
File type အနေနဲ့ (၂)မျိုး ရှိပါတယ်။ .scss ကို အများဆုံး အသုံးပြုကြတယ်။ .sass ကတော့ အသုံးပြုတာနည်းတယ်။ ရေးနည်းမှာ curly braces နဲ့ semicolons တွေမပါဝင်ပါဘူး။ ဒါပေမယ့် sample code ပြတဲ့အခါမှာ syntaxes နှစ်မျိုးလုံးနဲ့ ပြပေးသွားပါမယ်။
Sass Installation
Sass က independent platform ဖြစ်ပြီး Programming language အနေနဲ့ Ruby ကို အခြေခံထားပါတယ်။ Install လုပ်တဲ့နည်းလမ်းတွေလည်း အများကြီးရှိပါတယ်။ Sass official website မှာ အသေးစိတ်လေ့လာနိုင်ပါတယ်။
Sass Compiler
ပထမပိုင်းပြောခဲ့သလိုပဲ Sass code ကို CSS code ပြောင်းပေးဖို့အတွက် နည်းလမ်းတွေ အများကြီးရှိပါတယ်။ Command သုံးပြီးတော့လည်း compile လုပ်နိုင်တယ်။ အခု ဒီ blog မှာတော့ VS code ရဲ့ extension တစ်ခုဖြစ်တဲ့ Live Sass Compiler ရဲ့ အသုံးပြုနည်းလေးကို ပြပေးသွားပါမယ်။
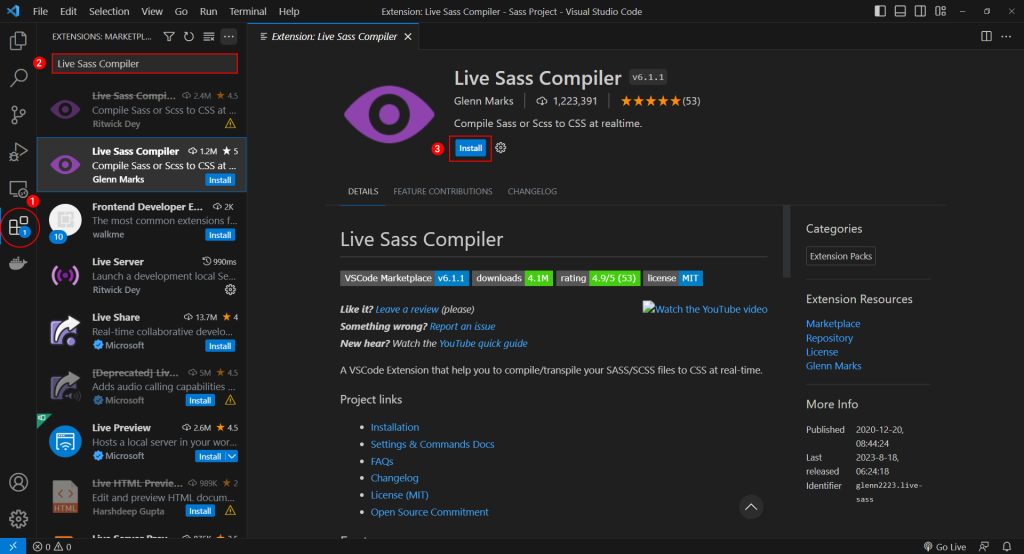
ပုံ(၁)မှာ ပြထားတဲ့အတိုင်း install လုပ်နိုင်ပါတယ်။
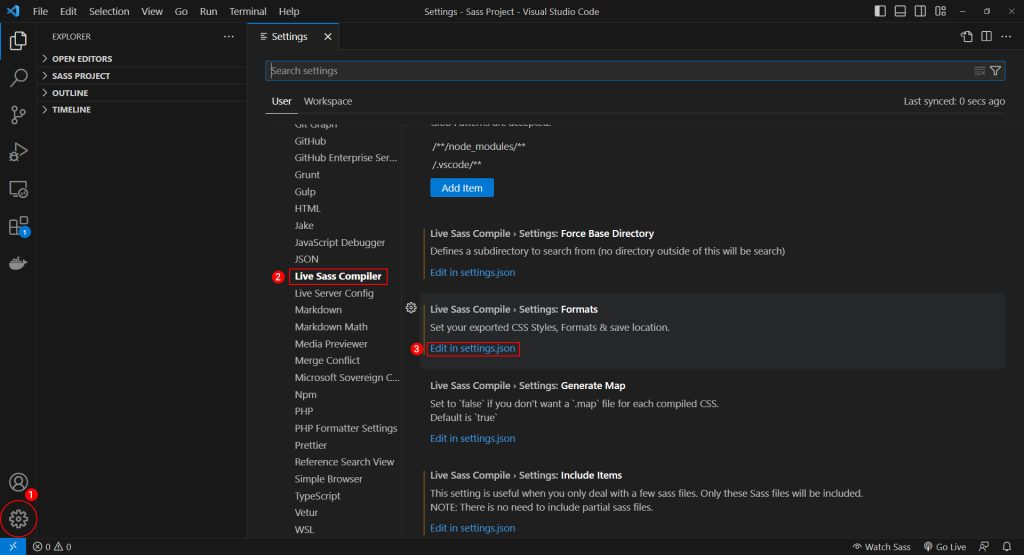
Compiled လုပ်ပြီး ထွက်လာတဲ့ CSS ဖိုင်ကို ထားမယ့်နေရာအတွက် setup လုပ်ပေးဖို့လိုပါမယ်။ အဲ့ဒီအတွက် ပုံ(၂)မှာ ပြထားတဲ့အတိုင်း settings.json file မှာ ပြင်ပေးရပါမယ်။
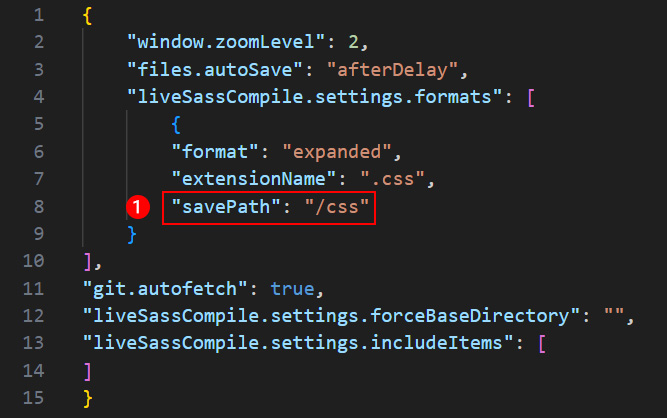
ပုံ(၃)မှာ ပြထားတဲ့အတိုင်း ကိုယ်ထားမယ့် ပတ်လမ်းကြောင်းပြင်ပြီး save လိုက်ရင်ရပါပြီ။
Install လုပ်ပြီးသွားပြီဖြစ်တဲ့အတွက် status bar မှာ ပုံ(၄)ကလို Watch Sass ဆိုပြီးပေါ်လာပါလိမ့်မယ်။ အသုံးပြုနည်းကတော့ အဲ့ဒီ Watch Sass ကို click လိုက်ရင်ရပါပြီ။ Stop ချင်ရင်လည်း နောက်တစ်ချက်ပြန် click လိုက်ရင် ရပ်သွားပါလိမ့်မယ်။

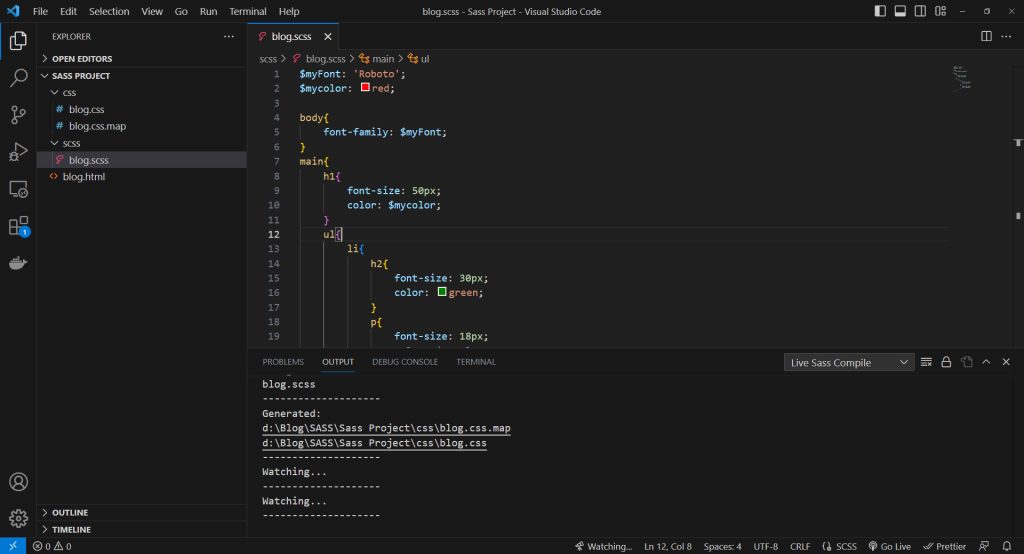
ပုံ(၅)မှာ ပြထားတဲ့ sample code အတိုင်း Scss file တစ်ခုဖန်တီးပြီး Watch Sass လုပ်လိုက်မယ်ဆိုရင် ပုံ(၃) မှာ ကိုယ် save လိုက်တဲ့ ပတ်လမ်းကြောင်းအတိုင်း CSS file ကို ထုတ်ပေးပါလိမ့်မယ်။ .css နဲ့ .css.map ဆိုပြီး နှစ်ဖိုင်ထုတ်ပေးပါတယ်။ HTML file မှာ .css file ပဲချိတ်ပေးရင်ရပါတယ်။ Scss file မှာတစ်နေရာပြင်တိုင်း အောက်က output မှာ auto ထုတ်ပေးနေတဲ့အတွက် သုံးရတာ အဆင်ပြေပါတယ်။ ရေးနည်းမှားရင်လည်း error ထုတ်ပေးတဲ့အတွက် code စစ်ပြီးသားလည်း ဖြစ်တယ်။
Sass Variables
Stylesheet မှာ ပြန်လည်အသုံးပြုချင်တဲ့ properties တွေရဲ့ values တွေကို variable အနေနဲ့ ကြေညာပြီး အသုံးပြုလို့ရပါတယ်။ နောက်ပိုင်း update လုပ်ချင်တဲ့အခါမှာ တစ်နေရာထဲမှာပဲ ပြင်ရတဲ့အတွက် အချိန်ကုန်လည်း သက်သာစေပါတယ်။ Variable ကြေညာဖို့အတွက် $ symbol ကိုအသုံးပြုပါတယ်။ အများဆုံး variable ကြေညာတဲ့ properties တွေကတော့ font နဲ့ color တို့ဖြစ်ပါတယ်။
SCSS
$myFont: 'Roboto' , sans-serif;
$mycolor: red;

body {
    font-family: $myFont;
    color: $mycolor;
}
Sass
$myFont: 'Roboto' , sans-serif
$mycolor: red

body
    font-family: $myFont
    color: $mycolor
CSS
body {
  font-family: "Roboto", sans-serif;
  color: red;
}
Sass Nesting
CSS selectors တွေကို HTML လိုပဲ တစ်စုတစ်စည်းတည်း သူ့အဆင့်နဲ့သူ ရှင်းရှင်းလင်းလင်းရေးလို့ရပါတယ်။ Nesting ကို အသုံးပြုရတာ CSS ထက် ရှင်းလင်းပြီး ဖတ်ရတာ လွယ်ကူပါတယ်။
SCSS
nav {
    ul {
        margin: 0;
        padding: 0;
        list-style-type: none;

        li {
            display: inline-block;

            a {
                display: block;
                padding: 6px 12px;
                text-decoration: none;
            }
        }
    }
}
Sass
nav
    ul
        margin: 0
        padding: 0
        list-style-type: none

        li
            display: inline-block

            a
                display: block
                padding: 6px 12px
                text-decoration: none
CSS
nav ul {
  margin: 0;
  padding: 0;
  list-style-type: none;
}
nav ul li {
  display: inline-block;
}
nav ul li a {
  display: block;
  padding: 6px 12px;
  text-decoration: none;
}
Sass Partials
Underscore (_) နဲ့ စတဲ့ file အားလုံးကို partial Sass file လို့ခေါ်ပါတယ်။ File name အစကို underscore (_) နဲ့ပေးမှသာ CSS file မထုတ်ပေးမှာဖြစ်ပါတယ်။ တခြားဖိုင်ကနေ ပြန်ခေါ်သုံးချင်တဲ့အခါမှာ @import ကိုအသုံးပြုပါတယ်။ @use နဲ့လည်းပဲ ခေါ်သုံးလို့ရပါတယ်။ ခေါ်တဲ့အခါမှာ underscore (_) နဲ့ file extension ကို ထည့်ပေးစရာမလိုပါဘူး။
SCSS
// _colors.scss
$myRed: red;
$myGreen: green;
$myBlue: Blue;

// style.scss
@import "colors";

h1 {
    color: $myRed;
}
h2 {
    color: $myGreen;
}
p {
    color: $myBlue;
}
Sass
// _colors.sass
$myRed: red
$myGreen: green
$myBlue: Blue

// style.sass
@import "colors"

h1
    color: $myRed

h2
    color: $myGreen

p
    color: $myBlue
CSS
h1 {
  color: red;
}
h2 {
  color: green;
}
p {
  color: Blue;
}
Sass Modules
Sass ဖိုင်အားလုံးကို ဖိုင်တစ်ခုတည်း ရေးဖို့မလိုအပ်ပါဘူး။ လိုအပ်ရင် modules ထုတ်ပြီး ခွဲရေးလို့ရပါတယ်။ e.g variables, mixins, and functions တွေကို modules အနေနဲ့ ထုတ်ပြီး ကိုယ်အသုံးပြုချင်တဲ့ဖိုင်မှာ @use rule ကိုသုံးပြီး ပြန်ခေါ်သုံးလို့ရပါတယ်။
SCSS
// _base.scss
$myFont: 'Roboto', sans-serif;
$myColor: red;

body {
    font-family: $myFont;
}

// style.scss
@use "base";

p {
    color: base.$myColor;
}
Sass
// _base.sass
$myFont: 'Roboto', sans-serif
$myColor: red

body
    font-family: $myFont


// style.sass
@use "base"

p
    color: base.$myColor
CSS
body {
  font-family: "Roboto", sans-serif;
}
p {
  color: red;
}
Sass Mixins
ပြန်လည်အသုံးပြုချင်တဲ့ styles တွေကို group ဖွဲ့ထားပြီး ကိုယ်အသုံးပြုချင်တဲ့အခါမှာ @include နဲ့ ပြန်ခေါ်သုံးလို့ရပါတယ်။ အဲ့ဒီလိုရေးခြင်းဖြင့် Sass ကို ထပ်ခါထပ်ခါရေးခြင်းကနေ လျှော့ချပေးနိုင်ပါတယ်။
SCSS
@mixin theme($theme: DarkGray) {
    background: $theme;
    box-shadow: 0 0 1px rgba($theme, .25);
    color: #fff;
}

.info {
    @include theme;
}
.alert {
    @include theme($theme: DarkRed);
}
.success {
    @include theme($theme: DarkGreen);
}
Sass
@mixin theme($theme: DarkGray)
    background: $theme
    box-shadow: 0 0 1px rgba($theme, .25)
    color: #fff

.info
    @include theme

.alert
    @include theme($theme: DarkRed)

.success
    @include theme($theme: DarkGreen)
CSS
.info {
  background: DarkGray;
  box-shadow: 0 0 1px rgba(169, 169, 169, 0.25);
  color: #fff;
}
.alert {
  background: DarkRed;
  box-shadow: 0 0 1px rgba(139, 0, 0, 0.25);
  color: #fff;
}
.success {
  background: DarkGreen;
  box-shadow: 0 0 1px rgba(0, 100, 0, 0.25);
  color: #fff;
}
Sass Inheritance
Selector တစ်ခုရဲ့ CSS properties တွေကို တခြား selector တစ်ခုကို share ပေးချင်တဲ့အခါမှာ @extend ကိုခေါ်ပြီး ရေးပါတယ်။
SCSS
%message-shared {
    border: 1px solid #ccc;
    padding: 10px;
    color: #333;
}

.message {
    @extend %message-shared;
}
.success {
    @extend %message-shared;
    border-color: green;
}
.error {
    @extend %message-shared;
    border-color: red;
}
.warning {
    @extend %message-shared;
    border-color: yellow;
}
Sass
%message-shared
    border: 1px solid #ccc
    padding: 10px
    color: #333

.message
    @extend %message-shared

.success
    @extend %message-shared
    border-color: green

.error
    @extend %message-shared
    border-color: red

.warning
    @extend %message-shared
    border-color: yellow
CSS
.warning, .error, .success, .message {
  border: 1px solid #ccc;
  padding: 10px;
  color: #333;
}
.success {
  border-color: green;
}
.error {
  border-color: red;
}
.warning {
  border-color: yellow;
}
Sass Operators
CSS မှာလိုမျိုး Sass မှာလည်း operators တွေက အသုံးဝင်ပြီး ရေးရတာ လွယ်ကူရိုးရှင်းပါတယ်။
SCSS
@use "sass:math";

.container {
  display: flex;
}

article[role="main"] {
  width: math.div(600px, 960px) * 100%;
}

aside[role="complementary"] {
  width: math.div(300px, 960px) * 100%;
  margin-left: auto;
}
Sass
@use "sass:math"

.container
  display: flex

article[role="main"]
  width: math.div(600px, 960px) * 100%

aside[role="complementary"]
  width: math.div(300px, 960px) * 100%
  margin-left: auto
CSS
.container {
  display: flex;
}
article[role=main] {
  width: 62.5%;
}
aside[role=complementary] {
  width: 31.25%;
  margin-left: auto;
}
ဒီနေ့တော့ ဒီလောက်နဲ့ပဲ အဆုံးသတ်လိုက်ပါတော့မယ်။ ဖတ်ကြည့်လို့ အကျိုးတစ်စုံတစ်ရာတစ်ခုခု ရသွားတယ်ဆိုရင်ပဲ ကျေနပ်ပါတယ်။ အားလုံးကို ကျေးဇူးတင်ပါတယ်။
Reference
https://sass-lang.com/guide/
https://www.w3schools.com/sass/sass_intro.php